Showing posts with label Recipes. Show all posts

Monday, October 28, 2013

Reese's Peanut Butter Cake with Peanut Butter Buttercream Frosting and Ganache...pure Heaven!


The baby girl recently turned 23.  Not sure how that's possible since I'm only 29, but with today's miracles of science, it can happen...living proof right here.

Back to THE cake.  I made this cake a few years ago for hubby's birthday and it was a huge hit, so I dragged out the recipe again (well, the part of the recipe I could find...more to come on that later).  You can get the recipe for the cake and PB frosting right here.

For the ganache/chocolate glaze, I used this recipe because I couldn't find the recipe I used the first time I made this cake...hand upside the head (see warning below).

I used mini Reese's PB cups and Reese's Pieces as a garnish...I mean what's better than chocolate and peanut butter on top of chocolate and peanut butter?


Now let me warn you, this cake is RICH.  I am proud to say I can eat a LOT of chocolate in one sitting, but this is truly a "one piece and you. are. done" kind of cake.  


And now for the warning about the ganache.  I subbed semi-sweet morsels for the bittersweet baking chocolate called for in the recipe....big mistake.  My glaze was more like syrup. I would imagine if you're going to use semi-sweet morsels, don't use the corn syrup. Better yet, just buy the *&%$ bittersweet baking chocolate and follow the recipe.  Lesson learned.  Still, even with my faulty ganache, this cake was UNBELIEVABLE.


Give this one a try...make sure you invite over enough friends to eat the entire thing 'cause I warn you, it is dangerously good and probably not low cal, but I'm just guessing on that point.

If you found this post helpful, please feel free to click your "Pin It" button to add this post to Pinterest, or a +1 for Google+.

Thursday, October 24, 2013

Chocolate Chip Gooey Bars...oh my!


We recently went to a wine tasting hosted by our friends where everyone was asked to bring a tasty tidbit to share.  I figured wine....chocolate....(okay, maybe this is not the kind of frou frou chocolate you're supposed to have with wine, but work with me here).  I've seen versions of the recipe all over the place, so I figured I'd give it a try.

First, the ingredients...pretty basic stuff....oh, and here's the printable recipe

CRUST
1 box yellow recipe cake mix (can also use Butter recipe)
*4-6 tbs. flour 
1 egg
1/2 c (1 stick) butter, melted


FILLING
1 8 oz. pkg cream cheese, softened
2 eggs
1 tsp. pure vanilla extract
1 16 oz. box powdered suga
1/2 c. (1 stick) butter, melted
1 c. chocolate chips

DRIZZLE
3/4 cup chocolate chips (add or subtract as needed)
1 - 2 tbs. shortening (same here, add or subtract as needed)

*The notation to add 4-6 tbs of flour is due to the fact that over the last few years, cake manufacturers have decreased cake mix box sizes from 18.25 ounces down to 16.25 and 15.25 ounces.  After an exhaustive google search, I've found recommendations to add 6 Tbs. of flour to make up for this decreased size.  I was a little nervous about this, so I only added 4 tbs. to this recipe.  It was fine.  


Preheat oven to 350 degrees.  Lightly grease a 9x13 in. pan.
In a bowl, combine cake mix, *flour, egg, and butter with an electric mixer. Mix well.  Pat into the bottom of greased pan and set aside.  Beat cream cheese until smooth with electric mixer, then add eggs and vanilla.  Slowly add powdered sugar and beat until combined.  Reduce the speed of mixer and slowly pour in melted butter.  Mix well. Stir in the chocolate chips. Pour filling onto cake mixture, spreading evenly.  Bake for 40-50  minutes (I left mine in closer to 50 minutes and probably overdid it a bit...try to leave the center a little gooey).  Remove from oven and allow to cool completely before cutting into bars.


DRIZZLE METHOD:

I find it super easy to just add chocolate chips (semi-sweet morsels) to a squeeze bottle, add a tbs. or 2 of shortening (depending on the quantity of morsels, and how runny you want the drizzle to be....add a little, then increase if necessary) and then just pop it in the microwave for a bit. Keep checking it and stir (I use a skewer) to make sure it's stirred really well. 


Then have fun drizzling. 


These were really good and will go into my regular rotation of things that I bake that make me chunkier than I want to be.  Whoever said, "Nothing tastes as good as skinny feels"...remind me to put down my chocolate and slap them.


Now, go pour yourself a glass of red wine and get busy baking!


If you found this post helpful, please feel free to click your "Pin It" button to add this post to Pinterest, or a +1 for Google+.

Monday, October 21, 2013

Pumpkin Pie Oatmeal


Well, here in New Orleans, the thermostat dipped below 70 so that means it's fall and I can officially gorge myself on all things pumpkin!!

I'm not a huge oatmeal fan, but I know it's good for me and, well frankly I could eat pumpkin off a crusty old shoe, so I decided to give Pumpkin Pie Oatmeal a shot.

I perused the web and found a gojillion recipes, but none of them were exactly what I wanted and I had to go with the limited items I had on hand in my pantry.

Here's the concoction I came up with.... (printable recipe here)

Pumpkin Pie Oatmeal

1.5 cups Old Fashioned Oats
3 cups skim milk
3/4 cup pumpkin (not pumpkin pie filling)
9 dashes pumpkin pie spice
2 dashes cinnamon
1/4 tsp vanilla extract
3 tbs. Splenda brown sugar

Add all ingredients except Splenda brown sugar, bring to a gentle boil, then simmer for about 5 minutes. Add Splenda brown sugar at the end.  As far as spices, vanilla and sugar, use these to suit your individual taste.  If you don't like Splenda, you could always use honey, maple syrup...skies the limit.

Use your choice of garnishes, though this is perfectly delicious as is.  I used walnuts, cranberries and raisins.  I think you could also sub almond milk for the skim milk and it'd be mighty tasty.

And because I was feeling especially proud of myself (and because I had it in the fridge), I squirted on some whipped cream....uh huh, yes I did.

I made this yesterday for breakfast and reheated the leftovers this morning (added a splash of skim milk to loosen it up) and it was just as good.

This is a definite keeper recipe! Happy Fall y'all!!


If you found this post helpful, please feel free to click your "Pin It" button to add this post to Pinterest, or a +1 for Google+.

Tuesday, October 4, 2011

Chocolate Peanut Butter Cupcakes...mmmm

Our baby girl recently turned 21.  Since she's away at college, a traditional birthday cake isn't very practical, so I decided to bake her some cupcakes and drive them up to her. 

Now this is a 21st birthday, so it had to be a special cupcake.   To me, the most perfect flavor blend in the world is chocolate and peanut butter, so....Chocolate Peanut Butter cupcakes...and yes, they're as good as you think they are!  I ran across this recipe on Pinterest (which I am completely addicted to), and it led me to the little kitchen blog.  It's a very easy recipe and well worth the effort.


To die for Peanut Butter Cup Cupcakes
Cupcakes

1 (18.25 oz) package devil’s food cake mix (I used Duncan Hines)

1 (3.4 oz) package instant chocolate pudding mix

1 cup sour cream

1 cup vegetable oil

4 eggs

2 tsp pure vanilla extract

1 Tbsp instant espresso granules, dissolve it in 1/2 cup warm water

30 Reese’s Miniatures peanut butter cups, frozen.  You might have extras, so prepare to eat them...sacrifice, I know.


Peanut Butter Buttercream Icing

3 sticks unsalted butter, softened
1 cup creamy peanut butter

2 Tbsp pure vanilla extract

2 lbs powdered sugar

3-4 Tbsp low-fat milk (I used skim since it's what I had on hand)

Reese's peanut butter cups minis (in a bag & they come unwrapped)

Directions:

Cupcakes

Be sure to preheat your oven to 350 degrees F. Place cupcake liners in your cupcake or muffin pan.  I think I got about 20 cupcakes from this recipe since my liners were slightly larger than normal.

In a large mixing bowl with a hand mixer or your stand mixer bowl using the paddle attachment, mix together all of your ingredients except the peanut butter cups for minute or two until well mixed.

Place 3 Tbsp of cake batter in each cupcake liner (I used an ice cream scoop as a measurement, due to my larger liners). Take one frozen peanut butter cup and place in the center of each cupcake on top of the batter, press down a little bit.


Bake for 18 to 22 minutes or until several cupcakes pricked with a toothpick come out clean. Do not prick the cupcake where the peanut butter cup is inserted. There will be a slight indentation or hole where the cupcake is sunken in from the peanut butter cup, you'll fill that with icing. Allow the cupcakes to cool in the pan for 5 to 10 minutes.

Remove cupcakes from the pans and place them on a cooling rack & let them cool all the way. While the cupcakes are baking you can make the buttercream icing.

Peanut Butter Buttercream

In your stand mixer bowl using the paddle attachment, mix thoroughly the softened butter and peanut butter on low to medium speed. Turn off your mixer and in two batches, add the powdered sugar and mixing until well blended. Be careful, the powered sugar can go everywhere!

Add vanilla and 3 to 4 tablespoons of milk a little bit at a time while blending on low speed. Blend until well combined. You'll start to see the icing pull from the sides of the bowl. Add a little bit more milk to get to the right thinness (to your preference). Keep blending, higher the speed, until nice and fluffy, about 5 to 7 minutes.

Using a big round tip (I used a star tip) and decorator bag, pipe icing onto cooled cupcakes and top with a mini on each cupcake.


Don't they look scrumptious?  I have to warn you, they are soooo rich, even a chocolate/peanut butter veteran like me could only eat one per sitting....and that's saying something!


This recipe is definitely a keeper...mix up a batch and enjoy!!

Monday, July 11, 2011

Meatless Monday - Beach Shrimp

I tore this recipe from the pages of Southern Living several years ago, and it's been a family favorite ever since.

Super simple, fast, tasty, sloppy....what else could you want?  This is a great dish to prepare for a gathering of family and friends.  We plop this dish down into the middle of the table, tear off hunks of hot, crusty French bread, and go all in.  At the end of the meal, it's nothing but shrimp peelings, wadded up paper towels ('cause I ain't using good napkins) and buttery smiles of gluttony.


Beach Shrimp
Ingredients
  • 3 pounds unpeeled, large raw shrimp*
  • 1 (16-oz.) bottle Italian dressing
  • 1 1/2 tablespoons freshly ground pepper
  • 2 garlic cloves, pressed
  • 2 lemons, halved
  • 1/4 cup chopped fresh parsley
  • 1/2 cup butter, cut up
Preparation
  • 1. Place first 4 ingredients in a 13- x 9-inch baking dish, tossing to coat. Squeeze juice from lemons over shrimp mixture, and stir. Add lemon halves to pan. Sprinkle evenly with parsley; dot with butter.
  • 2. Bake at 375° for 25 minutes, stirring after 15 minutes. Serve in pan.
  • *3 lb. frozen peeled, large raw shrimp, thawed according to package directions, may be substituted. Prepare recipe as directed, reducing pepper to 1/2 tsp.
Click here for the printable recipe.


Make sure you get nice size shrimp.  This wasn't the biggest of the bunch, but it's the one that got the photo op...yummmmm!  Snap off the heads, but leave the peel on.


I made a double batch, so that's why it looks like Paula Deen was in charge of butter portions.  


I hate clean up, so I even use a disposable pan.  I told you this was easy.


I promise, this will become one of your favorite meals.  You can worry about your diet and your arteries tomorrow.

Monday, June 27, 2011

Meatless Monday - Shrimp Quesadillas


Loved this recipe.  I confess, I stole it straight from The Pioneer Woman's blog.

Ingredients

  • Flour Tortillas (I used whole wheat)
  • 12 whole Large Shrimp, Peeled And Deveined (I used 1 lb. of smaller shrimp)
  • 8 ounces, fluid Mexican Red Sauce
  • 1 whole Large Onion
  • 1 whole Red Bell Pepper
  • 1 whole Green Bell Pepper
  • 2 cups Cheese, Grated (Monterey Jack Is Best)
  • 2 Tablespoons Olive Oil
  • Salt to Taste 

Preparation Instructions

Pour red sauce over shrimp. Set aside.
Chop vegetables into large pieces. Heat skillet over high heat and add olive oil. Cook vegetables over high heat until they start to get brown/black. Remove from skillet and set aside.
Return skillet to high heat, then dump in the shrimp with the sauce. Cook, stirring only occasionally, until shrimp is opaque. Add in a little water if the sauce gets dry. Remove from skillet and chop into bite-size pieces.
In a separate skillet, heat butter. Place a tortilla in the skillet, then layer on ingredients: cheese, vegetables, and shrimp. Top with a little more cheese and a second tortilla. Cook on both sides, adding butter before flipping to the other side so the tortilla isn’t overly dry.
Remove from skillet and slice into wedges

Serve with sour cream, guacamole, red or green salsa...whatever you like.


This is a definite keeper!!

Wednesday, June 22, 2011

Chocolate anyone?

I have been very lazy with my blogging lately.  It's summer, it's hot, I'm lazy....pick an excuse.

Anyway, I whipped up this quick dessert for my husband, dad o' my children, on Father's Day.  He's a simple man....he only wants one thing in a dessert...chocolate...on top of chocolate....with a little chocolate sandwiched between the layers...maybe some chocolate sauce on top....you get the picture.

He's been working so hard, that we decided to just take it easy on Father's Day.  I cooked him a big ol' meatloaf and some baked macaroni....a hunk of meat and a slab of cheese with some macaroni wedged in there for show.  A perfect "Man" meal.  Now I needed a perfect, easy dessert.

Did I mention he likes chocolate?

This couldn't have been easier

Ingredients:

1 baked Devil's Food cake
2 boxes chocolate pudding (instant, cooked...whatever you like)
1 ginormous tub of whipped topping
semi-sweet morsels
toasted pecans, walnuts...whatever

1.  Bake the cake according the directions on the box....yes, it was a box recipe...I said I was lazy.  Allow it to cool and then cut into 1" cubes.

2.  Prepare the pudding according to directions just before you're ready to assemble.

3.  Layer 1/2 the cubed cake into your trifle dish (or bowl).

4.  Pour on 1/2 the pudding

5.  Throw in some semi-sweet morsels and toasted nuts...however much you want.

6.  Layer on 1/2 the whipped topping.

7.  Repeat steps 3-6.

8.  Garnish with sprinkles if you like.


Can I just say that this is really good if you heat up some hot fudge sauce and pour it over your individual serving....I'm just saying....

This can be altered however you wish....use different flavors of cake, pudding, maybe put some fruit in between the layers...the possibilities are endless.  I think it'd be really good with lemon cake, vanilla pudding and maybe some blueberries/strawberries.  But this was all about Dad...and chocolate.

Enjoy!!

Wednesday, June 8, 2011

"Sangria....I just had a glass of Sangria....

and suddenly that name, will never be the same to me...."

Okay, no I didn't literally just have a glass of Sangria...and it has absolutely nothing to do with West Side Story, but Sangria/Maria...get it?  No...well, after you've had a pitcher or two of this Nectar of the Gods, you'll be making up your own theme music.

Believe it or not, up until a few weeks ago I had never had Sangria...I know...shocking even to me.  Found this wonderful recipe for White Sangria  and, just like that, a new favorite was  born.

I used a magnum (1.5L) of Barefoot's Sauvignon Blanc. 

I know...big spender...but I had it and I figured it would be doctored up with peach schnapps, and all the other goodies.  I used lots of sliced oranges and lemons.  Also added frozen mangoes and peaches. 

This is best if you can make it the day before (just don't add the ginger ale until the last minute) so that the fruit can get adequately tipsy. 


It's perfect for summer....cocktails and dessert all in one!  Mix up a batch and soon you'll be singing show tunes, too.

Monday, June 6, 2011

Meatless Monday - Slow Cooker Corn Chili

I know it's summer and nobody's thinking about chili, but hey, if a recipe includes the words "Slow Cooker"...which in my mind means lazy, throw it together in 10 minutes, fuggedaboutit the rest of the day... then it's fair game anytime of year.

Got this recipe off of the Meatless Monday website.

I pretty much followed the recipe, except I added Cajun seasoning, garlic powder and Tiger Sauce (you can substitute Tabasco) right at end.

 I also used red onions and shredded cheese for garnish...I DON'T do cilantro.  Yuck!

  This was super easy and we all really liked it. 


Give it a try....

Monday, May 30, 2011

Meatless Monday - Crawfish Monica

This is a recipe that I've used for years and is a favorite in our house.  At the New Orleans Jazz & Heritage Festival, this is one of the "must eat" dishes. 

Creole Crawfish Monica

If you can't get crawfish in your area, I'm sure you could substitute shrimp.  Also, I usually throw in some parmesan cheese to give it a little more "oomph".

Enjoy!!

Monday, May 23, 2011

Meatless Monday - Frittata

Some Mondays you just can't muster the energy to put a big meal together.  I've been in that frame of mind now for a while.  Come to think of it, I kind of feel the same on Tuesdays, Wednesdays...you get the picture.

The weather has been so nice that all I want to do when I get home from work is grab a big glass of iced tea and head outside to putter around the garden.  Every man for himself as far as dinner is concerned.


Sadly, we can't live on PB&J sandwiches, so it's time to cook.

Today's Meatless Monday recipe is brought to you courtesy of Giada De Laurentis.  Oftentimes I find her recipes a little too bland, but we really liked this one.   It took maybe 30 minutes from start to finish....really simple.


Changes I made....cause you know I did:  

1.  I added a little cajun seasoning

2.  I couldn't find Fontina cheese (I was only stopping at once grocery store, not going on a scavenger hunt) so I just used shredded Italian blend....worked out fine.


Delicioso!!

Monday, April 25, 2011

Meatless Monday - Eggplant Lasagna

 I love me some Italian food...I mean, other than chocolate, what's better than tomato sauce and cheese...so when I'm looking for meatless dishes, I naturally gravitate towards pasta.  I searched the all knowing Google and couldn't find a recipe that I really liked, so I combined several of them and came up with my own. 


Today, you get a bonus, simple salad recipe to go along with your main dish.


Eggplant Lasagna
with Ricotta and Parmesan

Ingredients:

28 ou. can crushed tomatoes
14.5 ou can Fire Roasted diced tomatoes
1/4 cup red wine
2 eggplants
1 onion
3 cloves garlic (or a couple tsps of minced garlic)
4 tbs. olive oil, plus more for eggplant
15 ou. ricotta cheese
2 lg. eggs
1/2 cup fresh basil, chopped
1/4 cup fresh oregano, chopped
1 tbs. Italian seasoning blend
Grated Italian Cheese blend

Directions:

1. Heat broiler. In 2 batches, arrange the eggplant slices on a broilerbroof baking sheet, brush with olive oil and season with salt and pepper. Broil until charred and tender, 4-5 mins. per side.

2. Meanwhile, pour 4 tbs. of olive oil in skillet and brown onions and garlic. Turn off the fire and pour in the red wine. Immediately turn the fire back on high and allow the wine to cook off, scraping the pan to get all of the goodies off the bottom. Add crushed tomatoes and diced tomatoes, oregano, and Italian seasoning blend. If you don’t have fresh oregano, just add extra Italian seasoning.  As always, all of my seasoning measurements are approximately.  Add or subtract to your taste.

3. In a small bowl, combine the eggs, ricotta, basil and 1/4 tsp each salt and pepper.

4. Spread 1/3 tomato sauce in the bottom of a 9x12 baking dish. On top of it, layer 1/2 the eggplant slices, half the ricotta mixture. Repeat for the next layer, finishing with the final 1/3 tomato sauce. Sprinkle grated Italian cheese blend on top.

5. Bake at 400 until bubbly, about 20 mins. Let rest 10 minutes before serving.


and here's your bonus side salad recipe


SALAD:

4 cups mixed baby greens
chopped red onion
Grated Italian cheese blend

ITALIAN VINAIGRETTE DRESSING:

1/4 cup red wine vinegar
1/2 tsp minced garlic
1 tsp. Dijon mustard
2 tbs. fresh oregano/2 tsp dried
3/4 cup olive oil
salt and pepper

Mix all ingredients. Shake. Dress salad immediately before serving.


I have to tell you, we REALLY liked this meal.  Even Meg, who has "food texture issues" enjoyed the eggplant.  Definitely a keeper.

Monday, April 18, 2011

Meatless Monday - Crunch Romain Salad with Sweet and Sour Dressing

This is a delicious salad that was introduced to us a few years ago by my daughter's future Mother in Law, Ginger....so, we call it Ginger's Salad.
It's from the Mississippi Junior League cookbook and it is DELICIOUS!

The only change I make is that I substitute Splenda for the sugar...and I add red onions.

On "Meat Days" it's also really good if you marinate boneless, skinless chicken breasts in a variation of this dressing (overnight preferably), pop them on the grill, slice and place on top of the salad.  I could almost live off of this meal.

Hope you enjoy!


Monday, April 11, 2011

Meatless Monday - Vegetarian Chili

Today's Meatless Monday recipe is brought to you courtesy of my friend Jenn over at jenuinemoments.  She turned me onto this recipe and boy, am I glad.

It's actually a Rachael Ray recipe...and before you Rachael Ray haters write this one off, try to have an open mind.

...and because I'm lazy and it's just easier for me to post this link to the recipe....here ya go.


I pretty much followed the recipe, except I did add a can of diced garlic/onion tomatoes.  It'd be just as good without that addition, and when I make this again, I'll probably leave it out just to see.  I also just used diced jalapenos in a jar....I warned you I was lazy.


Wednesday, April 6, 2011

Calling all silver wearers...help is on the way!!!


I wear a lot of silver jewelry and for some reason a lot of it had begun to tarnish recently.  I spent hours with those pesky, oily, little silver cloths polishing each piece until it glistened, only to have them tarnish again in no time.  Since patience is not a virtue I've been able to master, I knew I had to find a better solution.

As far as I'm concerned, there's only one place to go for the answers to all of life's questions...the all knowing Google!!

Lo and behold, I came across this little life saver.

Here's what you'll need:

Glass/Ceramic Bowl
Aluminum foil
water
baking soda
salt
dishwashing liquid
polishing cloth

1.  First boil a cup of water (or enough to cover your jewelry)

2.  Line your bowl with aluminum foil

3.  Add 1 tsp of baking soda, 1 tsp of dishwashing liquid and 1 tsp of salt to the dish.  It'll get a little bubbly.


This is what the solution looks like at the beginning of the process.

4.  Place your silver jewelry into the bowl, allowing all pieces to touch the aluminum foil.  Allow to soak 5-7 minutes


After a few minutes, it begins to turn this dirty color and develops a bit of an odor.

5.  Remove the jewelry from the cleaner and rinse under cool water.  You might want to use tongs to retrieve the jewelry as those with sensitive skin might be affected. It didn't bother me at all though.

6.  Some pieces might require a light buffing to remove a sort of film.  I think only one pair of my earrings required this. 

Nice, shiny jewelry
 It's amazing how something this simple can make me so happy!

I did this about a month or so ago, and all of my pieces are still tarnish free.  I've read that this solution can be used on all sorts of silver...jewelry, serving pieces, etc....you just have to adjust the amounts of each ingredient to suit your needs.

Now go gather up all that nasty jewelry and bring it back to life!


Monday, April 4, 2011

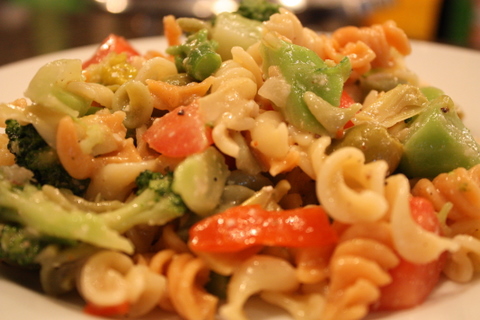
Meatless Monday - Italian Pasta Salad

Today's Meatless Monday recipe is one of my all time favorite, go-to recipes.  I've been making this for years and it's an often requested dish at family/friend gatherings

For the Italian Pasta Salad you'll need:


1 lb. Rotini Tri-Color Pasta
(if I'm making this just for our family I use wheat pasta and it's equally good)
1 jar Italian Giardiniera mix
1 lg. jar Salad Olives
Marinated artichoke hearts (make sure you use marinated)
1 bunch broccoli
1 red onion
3 tomatoes
1 bottle Robusto Italian dresing
1 bottle Ceasar Vinaigrette
Creole seasoning, salt, pepper - to taste
Parmesan cheese (use Parm/Reggiano or Parm/Romano,
fresh grated is better)

***The amounts listed above are only a guide.  Use more or less of each ingredient to suit your own individual taste.  Add new ingredients, subtract the ones you don't like. This recipe is super forgiving.***

Directions:

Boil pasta (al dente)

Chop and cook broccoli...do not overcook or it'll be a mushy mess

Chop onion and tomatoes  

Drain most of the liquid from giardiniera, olives and marinated artichoke hearts.  Rough chop giardiniera and artichoke hearts.

Add above ingredients to bowl.

Add half a bottle of each salad dressing to moisten the ingredients.

Add cheese, creole seasoning, salt and pepper to taste.  (Taste before adding salt as the dressing, olives, cheese, etc. are already salty.)

Just before serving, add more salad dressing to taste.

***I find this recipe is much better if made a day in advance.  It gives the ingredients a chance to blend and soak up the dressing. ***

Hope you enjoy!!

Monday, March 28, 2011

Meatless Monday - Shrimp Etouffee


Today's Meatless Monday invovlves SEAFOOD!!!!  Sorry, but if it doesn't moo, quack or oink, it's not considered meat in our house.  Shrimp are pretty quiet, so they're fair game on Meatless Monday.

INGREDIENTS:
(Now please understand, most of my measurements are "ish"....1tsp"ish" of whatever)

2 -3 lbs. peeled, deveined raw shrimp
2 cups chopped onion
2 tbs. minced garlic
1/2 cup green bell pepper
2/3 cup flour
2/3 cup oil
2 cans tomato paste
1 - 28 ou. can crushed tomatoes
2- 14.5 ou. cans diced tomatoes (I used garlic & onion flavor)
64 ou. seafood stock (you can sub chicken stock if necessary, but then it's not technically meatless)
Cajun seasoning to taste (I use Tony Chachere's)
Red Pepper Flakes to taste
2 Bay leaves
Tabasco to taste
1 tbsp Seafood seasoning
2 tbsp sweet basil
1 tsp Italian seasoning
1 tsp liquid Shrimp/Crab boil
salt and pepper to taste
pinch of sugar

First make your roux.  Don't panic, it's not hard.  In a heavy bottomed pan, heat the oil and cook the flour in the oil over medium to high heat (depending on your roux making skill), stirring constantly, until the roux reaches a dark reddish-brown color, almost the color of coffee or milk chocolate for a Cajun-style roux. If you want to save time, or prefer a more New Orleans-style roux, cook it to a medium,
peanut-butter color, over lower heat if you're nervous about burning it.

Once the roux reaches your desired color, quickly add your veggies to stop the roux from cooking.  Cook veggies until translucent.

Add tomato paste and cook down for a little while....enjoy the smell...mmmm.

Add tomatoes and cook a bit.

Add stock and all remaining ingredients except shrimp and cook for at least 2 hours.

About 30 minutes or so before you're ready to eat, add the shrimp (you can also substitute crawfish) and cook.

 
Serve over rice with some warm, crusty French bread and butter.
This also freezes well, so if you have any leftovers, you'll have dinner for another day.


Enjoy!!