Thursday, October 24, 2013

Chocolate Chip Gooey Bars...oh my!


We recently went to a wine tasting hosted by our friends where everyone was asked to bring a tasty tidbit to share.  I figured wine....chocolate....(okay, maybe this is not the kind of frou frou chocolate you're supposed to have with wine, but work with me here).  I've seen versions of the recipe all over the place, so I figured I'd give it a try.

First, the ingredients...pretty basic stuff....oh, and here's the printable recipe

CRUST
1 box yellow recipe cake mix (can also use Butter recipe)
*4-6 tbs. flour 
1 egg
1/2 c (1 stick) butter, melted


FILLING
1 8 oz. pkg cream cheese, softened
2 eggs
1 tsp. pure vanilla extract
1 16 oz. box powdered suga
1/2 c. (1 stick) butter, melted
1 c. chocolate chips

DRIZZLE
3/4 cup chocolate chips (add or subtract as needed)
1 - 2 tbs. shortening (same here, add or subtract as needed)

*The notation to add 4-6 tbs of flour is due to the fact that over the last few years, cake manufacturers have decreased cake mix box sizes from 18.25 ounces down to 16.25 and 15.25 ounces.  After an exhaustive google search, I've found recommendations to add 6 Tbs. of flour to make up for this decreased size.  I was a little nervous about this, so I only added 4 tbs. to this recipe.  It was fine.  


Preheat oven to 350 degrees.  Lightly grease a 9x13 in. pan.
In a bowl, combine cake mix, *flour, egg, and butter with an electric mixer. Mix well.  Pat into the bottom of greased pan and set aside.  Beat cream cheese until smooth with electric mixer, then add eggs and vanilla.  Slowly add powdered sugar and beat until combined.  Reduce the speed of mixer and slowly pour in melted butter.  Mix well. Stir in the chocolate chips. Pour filling onto cake mixture, spreading evenly.  Bake for 40-50  minutes (I left mine in closer to 50 minutes and probably overdid it a bit...try to leave the center a little gooey).  Remove from oven and allow to cool completely before cutting into bars.


DRIZZLE METHOD:

I find it super easy to just add chocolate chips (semi-sweet morsels) to a squeeze bottle, add a tbs. or 2 of shortening (depending on the quantity of morsels, and how runny you want the drizzle to be....add a little, then increase if necessary) and then just pop it in the microwave for a bit. Keep checking it and stir (I use a skewer) to make sure it's stirred really well. 


Then have fun drizzling. 


These were really good and will go into my regular rotation of things that I bake that make me chunkier than I want to be.  Whoever said, "Nothing tastes as good as skinny feels"...remind me to put down my chocolate and slap them.


Now, go pour yourself a glass of red wine and get busy baking!


If you found this post helpful, please feel free to click your "Pin It" button to add this post to Pinterest, or a +1 for Google+.

Monday, October 21, 2013

Galvez Restaurant - Gourmet Supper Club September '13 outing

One night last December, a group of friends were sitting around enjoying a wonderful evening...eating, drinking, laughing, drinking, laughing, drinking....you get the picture...hiccup.

We began to lament the fact that we're blessed to live in a city with so many wonderful dining options, but so little time to try them all.  

Well, one drink thing led to another and we decided to form the "Gourmet Supper Club".  We each put the names of restaurants we'd like to try in a bowl and picked 11 of them, and once a month we go together to these wonderful restaurants.  Why 11 you ask when a calendar clearly has 12 months?  No, it was not the alcohol....we saved our December outing for a special Reveillon Dinner to be determined at a later date.

During my absence from blogland, we tried quite a few wonderful restaurants....too many for me to go back and review, so I'll just start with September's outing....Galvez Restaurant.

The restaurant is on the 2nd floor and offers amazing views of the river and railways below.  As we dined and the sun set, the Crescent City Connection bridge lights came on and lit up the night sky and steamships and locomotives went about their daily business adding a wonderful soundtrack to our evening.  


It's a gorgeous restaurant in a quiet area of the French Quarter.  I am always fascinated with the statuary in the area. Apparently, so is our friend Mike....to avoid confusion....Mike's the one on the left.


But back to Galvez.  The restaurant is really beautiful and completely appropriate for special occasions or just a quiet dinner with friends.

We started our evening with a few pitchers of Sangria.  While it was very tasty, I have to admit I wasn't a huge fan of the fruit with rinds still on it. Just not my thing. Please peel the fruit...thank you.


I started my meal with the Manchego Bombas appetizer (a traditional Spanish dish of potato croquettes stuffed with manchego cheese, deep fried and served with quince sauce) This was okay....eh....kinda like fried cheese....overpriced fried cheese.  I wish I'd taken pics of everyone else's food, but I didn't want to be "that person"...ya know?  Our friend, Thorkil, had the seafood gumbo and it was delicious.  I think we all wished we would've gotten that.   


I figured if you're at a Spanish restaurant, ya gotta eat paella, so I went with the Paella Valenciana as my entree (served with mussels, shrimp, chorizo and chicken).  Again, I was underwhelmed.  On the plus side, it's a healthy portion and when I reheated it the next day for lunch it was much tastier than I remembered...seemed more flavorful.  


...and of course, I had to have dessert, so I got the Flan Estilo Galvez (classic Spanish custard with Caramel sauce topped with figs).  This was your basic flan....not bad....just basic flan.  


...and as I said, the view....well, it's hard to beat this.  


All in all, I'd give Galvez Restaurant a "C".  The food was just okay, but the views and atmosphere are "A+".  Some of our Supper Club group gives this a higher grade, and some a lower grade, so the reviews were mixed.

If I ever return, maybe I'd request a table outside on the 2nd floor balcony and just order tapas and drinks and enjoy a quiet, beautiful night in the French Quarter.

If you found this post helpful, please feel free to click your "Pin It" button to add this post to Pinterest, or a +1 for Google+.

Pumpkin Pie Oatmeal


Well, here in New Orleans, the thermostat dipped below 70 so that means it's fall and I can officially gorge myself on all things pumpkin!!

I'm not a huge oatmeal fan, but I know it's good for me and, well frankly I could eat pumpkin off a crusty old shoe, so I decided to give Pumpkin Pie Oatmeal a shot.

I perused the web and found a gojillion recipes, but none of them were exactly what I wanted and I had to go with the limited items I had on hand in my pantry.

Here's the concoction I came up with.... (printable recipe here)

Pumpkin Pie Oatmeal

1.5 cups Old Fashioned Oats
3 cups skim milk
3/4 cup pumpkin (not pumpkin pie filling)
9 dashes pumpkin pie spice
2 dashes cinnamon
1/4 tsp vanilla extract
3 tbs. Splenda brown sugar

Add all ingredients except Splenda brown sugar, bring to a gentle boil, then simmer for about 5 minutes. Add Splenda brown sugar at the end.  As far as spices, vanilla and sugar, use these to suit your individual taste.  If you don't like Splenda, you could always use honey, maple syrup...skies the limit.

Use your choice of garnishes, though this is perfectly delicious as is.  I used walnuts, cranberries and raisins.  I think you could also sub almond milk for the skim milk and it'd be mighty tasty.

And because I was feeling especially proud of myself (and because I had it in the fridge), I squirted on some whipped cream....uh huh, yes I did.

I made this yesterday for breakfast and reheated the leftovers this morning (added a splash of skim milk to loosen it up) and it was just as good.

This is a definite keeper recipe! Happy Fall y'all!!


If you found this post helpful, please feel free to click your "Pin It" button to add this post to Pinterest, or a +1 for Google+.

Saturday, September 28, 2013

Road to Hana - Maui


In researching our recent trip to Maui, I learned that another of the MUST DO's along with experiencing a sunset atop Haleakala crater was driving the Road to Hana.  They say this 50 mile drive on Hwy. 36 takes about 3 hours from Lahaina, but no, it's an all day drive....and you love every second of it.


Take my advice....rent a convertible. Trust me on this.  A view through a window won't cut it. 


The purpose of this trip is not to get to Hana...you won't even know you pass through Hana it's so tiny....it's the journey. This is a true "stop and smell the flowers" kind of experience.


For this adventure, we purchased the GyPSy app for my iPhone, plugged it into the car radio and we had a wonderful guided tour.  Lots of little factoids, where to stop for great pictures, even where to take potty breaks.  Stay tuned for further warnings advice from our GyPSy guide.  I highly recommend this app.


But back to the Road to Hana.  It's a 52 mile road with 59 bridges (46 of them are one lane) and roughly 620 curves....through gorgeous rainforests, plunging waterfalls, crystal clear pools and seascapes that pictures can't even begin to do justice.


One of the highlights for me was seeing the Rainbow Eucalyptus trees along the roadside, and at Ke'anae Arboretum. It's as though someone painstakingly painted the smooth bark of each huge tree with true artist's strokes.  I could spend a lifetime curled up under those trees with a good book.

Don't you love this?  A true work of art.

I could've spent an entire day at Wai'anapanapa State Park exploring the caves, sea arches and blowhole.


...and the black sand beach


The official trip ends at the Pools of Oheo, about 10 miles past Hana.


....and this is where you're advised....strongly....by the rental car company, even by the GyPsy guide, to turn around and head back from whence you came.  The other choice is to go around the "Back Side of the Road to Hana"....where portions of the road are ungraded and/or unpaved.  So we sat there...at the proverbial fork in the road...do we follow GyPsy guide's STRONG urging ("your guidance will cease if you turn left") or do we go rogue......


You KNOW what we did...we turned left....and OH MY GOD....we saw some of the most beautiful sights of our trip.  Don't get me wrong, the blind curves and guardrail free, fall off the side of a mountain, roads gave me plenty of OH *&%# moments, but it was sooooo worth it.

Since our GyPSy guidance ended at this point...along with our cell phone service and all communication with mankind....I'll also shut up and let you just enjoy the views...


We interrupt this peaceful drive to bring you....cows....because like it's not stressful enough to have a white knuckle, "Please God don't let us drive off the cliff" kind of afternoon, let's throw cows roaming across the road into the mix.  Uh huh.


....back to peaceful


So if you're ever in Maui, add the Road to Hana to your list....and while I am not advising anyone to break rules, rental car contracts, clean underwear or anything of the sort, sometimes the road less traveled really does bring the greatest reward.
Aloha


If you found this post helpful, please feel free to click your "Pin It" button to add this post to Pinterest, or a +1 for Google+.

Wednesday, September 25, 2013

Cheese Slaw - a crowd pleasin' dip


This Cheese Slaw recipe (and don't get turned off by the word "slaw"....it's really just a cheese dip) was first brought to my attention by my friend over at http://www.virginiasweetpea.com....and believe me, this was loooooong
before anyone knew her as Virginia Sweet Pea.
Since that time, it has passed amongst our group of friends across the globe.

It is ridiculously easy to make..maybe 10 minutes if you're a slacker...and it's always a huge hit.


Here's what you need:


Cheese Slaw


1 pound Swiss cheese, shredded
1 bunch green onions, chopped
1/2 cup mild banana peppers, finely chopped
1/4 cup pickled jalapeno peppers, finely chopped
Mayonnaise - enough to bind

Mix it all together and place it in a bowl.

Serve with crackers or corn chips....I like large Wheat Thins.

Printable Recipe

Seriously, chopping the green onions, banana peppers and jalapeno peppers is the hardest part.


Wasn't that exhausting?  I even conned my husband into grating the cheese. 
Usually I buy it in a bag pre-grated, but the grocery store was out....what's up with that?


I brought this to a wine tasting party Friday night with our Gourmet Supper Club group and it was "scooped" up.
I crack myself up sometimes....and that's not the wine talking...I'm just that corny.  

Next time you're looking for a quick crowd pleaser, whip up a batch of Cheese Slaw.
Wine optional...but I highly recommend it.


If you found this post helpful, please feel free to click your "Pin It" button to add this post to Pinterest, or a +1 for Google+.

Saturday, September 21, 2013

Sausage, peppers & onions sandwiches....low carb-ish, too.


I hijacked this recipe from the Food Network.  This is one of Pat Neely's recipes...and it is gooooood.

I needed to feed more than 4 people (and really, I can't imagine 1 lb. of sausage feeding 4 people anyway...
at least not 4 of my people).

Disclaimer....I forgot to add the Paula Deen's Sugar Free bbq sauce to this picture....you'll understand when you read below....shame on me.
My Ingredients:

olive oil
4 lbs. smoked sausage
2 yellow bell peppers
2 orange bell peppers
2 red bell peppers
garlic (heaping tbs. of minced, jarred garlic)
6 onions
12 oz. beer
1 small can tomato paste
1.5 (ish) cups bbq sauce

I pretty much followed the recipe as to preparation.  I just tweaked the proportions to suit my needs.

First off preheat your oven to 350 degrees, so you can toast your rolls for the sandwiches.


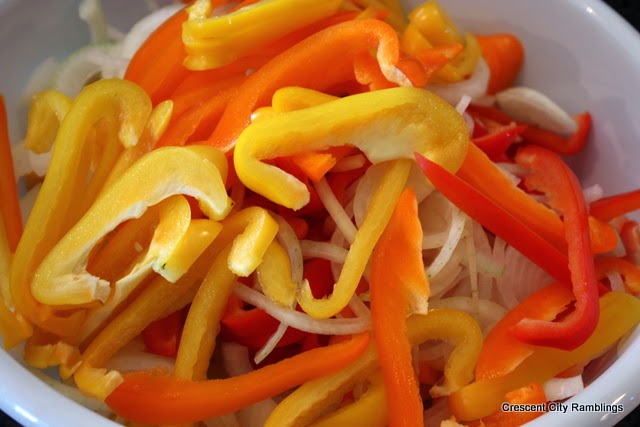
Slice the bell peppers and onions.  I LOVE raw bell peppers, so a few of these probably didn't make it to the next step.


Slice the sausage.  Okay, the recipe says to do this in quarters, but next time I'll probably cut the sausage a little bigger....like hot dog length....so they stay on the rolls a little better.


Brown the sausage on all sides in a little olive oil.  Do this in batches if you need to. After they get all nice and yummy, remove them to a plate and let them hang out a bit. Again, a few of these were casualties to my hungry belly.  
Hey, cooks are supposed to taste as they go, right?

Add the onions and peppers to the pot....have I ever mentioned how much I love my cast iron pots....seriously.....LOVE....anyway, cook the sausage and peppers until they're soft and tender, then add the garlic.  I'm lazy, so I use the jarred, minced garlic...a huge heaping tbs. or so...feel free to use the real stuff if you have the patience for it.  
Just cook it for a minute or two more. 


Then add the tomato sauce, beer and bbq sauce, cook it for a couple minutes, throw the sausage back into the pot, reduce the heat and simmer until the sauce thickens...15 minutes or so.

Also, since I'm trying to limit my sugar (okay, I know it's sausage...not the healthiest food in the world...but you gotta pick your battles), I used sugar free bbq sauce (I forgot to add that to my "Ingredients" picture above.)  There are several on the market...use your favorite.  I happened to see Paula Deen's Sugar Free bbq sauce at Sam's (and since I bought it at Sam's, I have enough for the rest of my life), so that's what I used. Gotta say, (and this is by no means an endorsement or condemnation of Paula Deen's recent "issues"), her bbq sauce was pretty darned tasty. Big thumbs up.  (I also did use about 1/2 cup of the Stubb's bbq sauce that's in the picture above....wanted to use up the little bit that was left in the bottle in my fridge.)  If you're going full sugar, there are TONS of choices, use your favorite bbq sauce...I won't judge.  

I hope you remembered to toast those rolls.....cause it's eatin' time!  Oh, and have plenty of napkins close by...plenty.


This is great for football season...get it ready and let everyone fend for themselves. Hope you enjoy.  
And while I'm at it....WHO DAT!

If you found this post helpful, please feel free to click your "Pin It" button to add this post to Pinterest, or a +1 for Google+.

Thursday, September 19, 2013

Nyx, Goddess of the Night

One of the exciting things I have on the horizon is my inaugural ride in the Mystic Krewe of Nyx on Wednesday, February 26, 2014. Believe me when I tell you, it can't get here soon enough.

Nyx was the Goddess of night. Her name, synonymous with Night, describes how her dark light falls from the stars, and she dictates to men and also to the gods.


Yep, that's me alright...Goddess through and through.  I must say, the irony of being a "Goddess of the night" is not lost on me....I can barely stay up past 10 pm.   Not to worry (throwing my head back and standing up tall), I am a Goddess, I will persevere....yawn.

Back to Nyx....along with signature beads, cups, coozies and assorted light up blinky things, Nyx's signature throw is a purse.  A purse you ask?  Yep, a purse...but not just any purse...a personally handcrafted glittery extravaganza of a purse.  
I hope to be attending some "official" purse decorating parties with other members of the Krewe soon, but in the meantime I couldn't help myself....I got started.

Now, give me glitter, feathers, jewels and a glue gun and I become drunk with excitement....drunk, I tell you!   Okay, there may have been a glass or two of wine involved. 


Did I mention glitter....and this is just a small sampling.  I will look like a Twilight vampire for many months to come. 


We just had our first official membership meeting this week and saw our signature throws for 2014.  AAACCCKK!  I can't give you any of the juicy details, but I can tell you come February 26, 2014, grab your mom and dem, pick your favorite spot... neutral ground or sidewalk side...and get ready. You will NOT want to miss the ladies of Nyx 2014. 

Just yell, "Throw me something Goddess".  Yep, that's got a nice ring to it, don't ya think?


If you found this post helpful, please feel free to click your "Pin It" button to add this post to Pinterest, or a +1 for Google+.